Showing posts with label cupcakes. Show all posts

Sunday, August 7, 2011

Swirly Glittery Cupcakes Tutorial


OK, well this isn't exactly a tutorial if there aren't step-by-step photos. I made these without the intention of blogging about them but a lot of people have been wondering how to get swirly frosting that holds its shape.. and even to get the rose-like look on them. So I decided (since these looked so pretty) to share these pictures with you and also explain verbally (as best as I can) how to get frosting like this.


1. I never make frosting with measured or weighed ingredients. I use my intuition- or I just see how well it's progressing.. But let's say for ingredients- I use 50g of unsalted butter (give or take 20g either way) that is softened. It is extremely important for the butter to be softened. I then mix in around 350g of icing sugar that isn't sifted. For one, I find sifting icing sugar extremely frustrating- you get little icing sugar smoke all around you. And two, I don't think the sifted factor makes much of a difference.


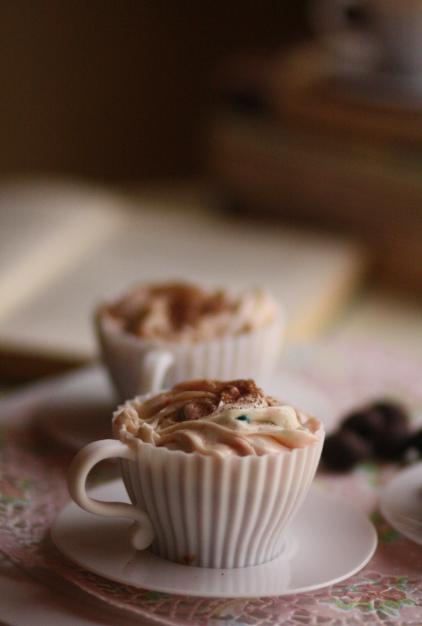
2. For cupcakes like these, you need frosting that is "tough".. or more solid.. Runny frosting won't do. Once you've mixed the butter and the icing sugar, add around 2-3 tablespoons of milk and beat well until combined. Add the gel food coloring at this point. Gel is best since you only need to add a very small quantity for strong color, and its nature doesn't change the consistency of the frosting-whereas liquid coloring would.


3. The longer you beat, the more fluffy and incorporated the entire mixture will become.

4. If the mixture is too runny, keep on adding more icing sugar to tighten/harden it up until you reach what you think is the right consistency. A lot of this is done by eye.

5. Take a piping bag (plastic or paper one) and pop a 1M nozzle inside. This is the most important part. It has to be 1M otherwise the size/shape of the piping will be different. Hold the piping bag open over a jug, and with a spatula, pile in the icing. Make sure that the piping bag is a bag which is floppy and not one of those mechanical syringe like ones. It's more challenging to use an actual piping bag but the results are so much better because you have a lot more control over it.


6. Hold the cupcake in your left hand if you are right handed and in your right hand if you are left handed and with the piping bag (nicely secured at the top) in your dominant hand, pipe from the center, bringing the bag around like you're drawing a snail pattern anticlockwise. Loosen your hand as you reach the outer edges of the cupcake (this will create somewhat larger swirls which will overlap creating petal-like features).

7. Release the piping bag from cupcake once you have covered the entire cupcake. Do not abruptly pull away as that will show on the cupcake. Instead, "seal" the frosting in by making the last bit of piping extremely thin and tight.


8. For the glitter, take a very thin (un-used!) paintbrush and open a pot of EDIBLE glitter, Dip the brush in the surface of the glitter in the pot. Bring the brush (whose tip is now coated with glitter) over the cupcake and with your index finger tap the brush. This will release all the glitter from the tip of the brush onto the cupcake. Tap the brush lightly while moving your hand around the entire cupcake so the glitter doesn't end up all in one place.

9. If you're using edible pearls, carefully place them around the swirls with your fingers.
  

Monday, August 1, 2011

Lemon and Mint Cupcakes

And I'm back. In Dubai that is. And back to blogging so it seems. I just spent almost two months in the wonderful city of London doing an internship. I loved my job- I learnt so much, both about the nature of the work and about myself. And more than anything, I fell even more in love with the city. I discovered new places, did different things, spent so much time just wandering around, and truly relished the city by fully absorbing its sights, sounds, and smells. And with that exploration and discovery, I found out how much I'm inclined to certain things. Those things being small businesses, entrepreneurship, tiny alleyways, the absolutely beautiful roadside cafe or bakery, and just the idea of walking and walking to places (which I almost never get to do in Dubai).

Maybe the thing that you might find funny reading that previous sentence was that I discovered how much I like entrepreneurship- since Dubai is in some ways considered to be the embodiment of that. And it is- in many ways. But mostly, I find businesses in Dubai to just consist of bringing the latest foreign fad to town. Or bringing the newest chain store which- gasp- doesn't have a branch in Dubai. Entrepreneurship should be the total opposite. It should aim to create a culture of its own, a following of its own, ideas and techniques of its own, and most importantly, an identity of its own.

But anyways, on to the recipe. I got back to Dubai- and the heat- with a longing for lemonade. Or anything lemon and mint, really. And almost suddenly, I had an idea of lemon and mint cupcakes. Lemonade cupcakes, in some ways. I wanted to put 7up in the cake batter (something like Irish soda bread, haha) but decided against it.


Ingredients
115g unsalted butter, softened
115g caster sugar
2 eggs
115g self raising flour
Juice and zest of half a lemon
-for the buttercream
66g butter
5cups icing sugar
2.5tbsp milk
Juice and zest of half  a lemon
1 tbsp mint leaves, finely chopped

12 mini lemon slices and 12 sprigs of mint- for decoration

Procedure
Preheat oven to 180C and line a 12 cup cupcake tray with liners. Beat the butter and sugar until pale and fluffy for about eight minutes on medium speed. The key for the sponge is for it to be very light and so beating the butter and sugar for a while really helps. Add the eggs one at a time, beating in between. Add the flour and fold in, followed by the lemon zest and juice. Fill the liners with batter and place in the oven in the lower rack for 15-20 minutes so that the top of the cakes reach the middle of the oven. When the cupcakes are done, bring them out of the oven and let them cool till room temperature before icing them with the buttercream.

For the buttercream: 
Beat the sugar and butter until incorporated, add the milk and beat. Fold in lemon juice and zest and chopped mint leaves. Beat on high for around six minutes until very fluffy.


Sorry for the picture quality... color-wise. When I edited the size, they somehow messed up and I didn't feel like changing anything, haha.


Monday, July 4, 2011

The Cake Decorating Weekend

This weekend I had the wonderful opportunity of taking cake decorating classes with both Eric Lanlard and Mich Turner who are, in today's words, epic cakemakers. I have books by both of them and whenever university work gets a little more stressful than usual, I plonk myself in bed and flip through the books whilst daydreaming. I'd rather be making cakes than taking politics notes that make no sense, really. (No, I still love my major.)

Eric, Mich, and Peggy Porschen have been the three people who have inspired me to create tiered cakes and glamourous/couture-y cakes like these mini rose cakes, this three-tiered cake, and the first one of them all- the one I decided to make one midnight: a simple two tiered imprinted cake. Their creations are the prime example of eye-candy and are awe-inspiring in their level of detail, elegance, and beauty.

The class that I took with Eric was the Cupcake Masterclass (Info for classes can be found here.) We learned how to work with gumpaste (Which I had never done before!- Gumpaste is slightly different from sugarpaste/fondant in its texture- it hardens fairly quickly), we used the gumpaste on silicon moulds to get desired shapes and then learned to how to color the figures and use glitter. Eric also showed us three lovely techniques to ice cupcakes (a wonderful swirl, petals, and one that was absolutely gorgeous and sort of looked like petals and leaves) Sadly I didn't manage to the last one really well. It was great since I tried a lot of things I hadn't tried before. The session was followed by a wonderful afternoon tea. Each of the sandwiches and pastries were presented soo beautifully that all of us gasped everytime they were brought out.  Only after I took the pictures did I realize that they were blurry- I was so excited to eat all of the goodies haha.


The class with Mich was a crowncakes and cookies master class at the beautiful Langham hotel on Regent Street. We learned how to ice and flood a cookie (I FINALLY learned how to flood a cookie- now I can use all my cutters to their full potential!) and then learned four wonderful designs for the crowncakes. I was quite proud of them- they looked so pretty I didn't want to eat them! But, also in this case, there was one technique I didn't quite master which was the candy striped cake. My lines were really squiggly and shakey :( But it was the design I loved best. The one I was happiest with though was the monochrome lace with pink icing in sashes and bows and drops. It was a great class ALSO followed by a wonderful afternoon tea. I hope I can recreate something like this on my own because my main issues seem to be getting the royal icing the right consistency and covering the cake neatly with fondant. More info on the classes here.


the squiggly cake.... but I made the rose myself!


I'm extremely glad I got to take both these classes and the icing on the cake (pun not intended) was that they were on consecutive days. I conquered my fears of gumpaste and royal icing and I'm ready to work with both of these mediums a lot more extensively than I previously had. 

Wednesday, June 15, 2011

Oooh, look! More cupcakes

The title of this post says it all. I had made some basic vanilla on vanilla cupcakes a while ago and never managed to post pictures of them.

You can find the recipe for both the cake and the buttercream in an earlier post here.

Tell me what you think!


Friday, April 15, 2011

Floral Pastel Feminine Cupcakes


I made these cupcakes for a friend's surprise birthday party that was yesterday. I wanted to go for something cute and pastel. And I wanted to use both the new fondant cutter set and drying roll slider that I had got. And so I came up with these. Light and moist with a vanilla buttercream topping. Only when I was icing the last batch did it strike me to add more icing sugar and see how the texture would change. Adding more icing sugar made piping the buttercream a lot better, the shape held more strongly since the buttercream was stiffer.

Here's the recipe I adapted from Magnolia's Bakery and The Hummingbird Bakery:

Yields about 55 mini cupcakes or 24 regular sized cupcakes.

Vanilla Cupcakes
1 cup butter, softened
1 and a 1/2 cups granulated sugar
4 eggs
1 and 1/2 cups self raising flour
1 and a 1/2 cups plain flour
1 cup milk
2tsp vanilla extract


Combine the flours in a bowl.
In a separate bowl, gradually add the sugar to the butter and beat until smooth and creamy. Add the eggs one at a time and beat after each addition. Add a third of the flours to the butter mixture, beat well. Follow with a third of the milk and vanilla. Repeat until all flour and milk are incorporated. Spoon into paper cases and bake at a preheated oven of 180C.

Vanilla Buttercream
85g softened unsalted butter
350g icing sugar, sifted
30ml milk


Beat the icing sugar with the butter until fully incorporated. Gradually add the milk while beating at slow speed until mixture comes together and is of the right consistency. Once all the milk has been added, increase the speed to high and beat for a couple of minutes.


To decorate, color the icing whichever colour you like. I used Wilton's gel food colouring in sky blue, creamy peach, and ivory. Use any piping tip ( I used a small and medium sized star tip) and piped a border and kept going further in until I had a little pile of icing at the top.


For the fondant decorations, color some fondant in the color of your choice by applying a little gel colouring to the fondant with a toothpick. Keep kneading the dough until the color is even throughout. Roll out on a surface lightly dusted with icing sugar and cut out shapes of your choice. If you'd like the shapes to be inverted, place them on a sloped or curved surface and allow to dry. Simply place the fondant decoration on top of the buttercream. To stick a smaller fondant decoration over a larger one (as in the picture above) use a little melted white chocolate or egg white. 


Friday, March 11, 2011

Cappuccinos and Cupcakes

Or both in one.


The minute I spotted these adorable silicone cupcake cases by Fred at Selfridge's, I snatched them. I could just imagine all the different scenarios I'd create with these teacups: elegant garden parties, a breakfast snack, an optical illusion..


Last week, I got this idea to make cupcakes in them and frost them in a way so that they look like the froth on a cappuccino. I was extremely adamant to capture them in natural light and so I baked the cupcakes last night and made the frosting this morning. Well, I didn't make the frosting. I bought the frosting. Shocking, isn't it? I had a huge internal battle with myself over that. But the pros outweighed the cons and so I crossed over to the dark side. Just for today though. I didn't have much time, and I really wanted the frosting to be perfect.. so I opted to use ready frosting. The idea of it is so appealing to the time-constrained.. Just frost it on! No mess, no dishes to wash, no consistency to get right. But no, I will not use ready frosting again. SIGH. Anyways, I frosted the cupcakes with Betty Crocker's rainbow chip frosting.. The pastel multicoloured quality of the frosting made the cupcakes look super cute.

I sort of compensated for using ready made frosting by using a recipe that I had developed myself.

Here's the recipe:

Ingredients:
120g butter
120g caster sugar
120g self raising flour
2 eggs
1 and 1/2 tablespoons vanilla extract
3 tablespoons milk
2 tablespoons cocoa powder.

Procedure:
Cream butter and sugar. Add eggs one at a time and beat well. Sift flour into mixture and fold in. Add vanilla extract, stir. In a small bowl mix cocoa powder with milk and stir (not thoroughly though... do not dissolve the cocoa entirely..) Add cocoa/milk mixture to batter and stir well. Yields about 9 cupcakes.. (five regular paper cased ones, and four silicon cupcake mould ones) Baking time around 12-15 minutes at 180C.


I had a lovely time styling these today though. Sorry if the pictures are repetitive.. I'm really proud of them though! There's nothing like using unobstructed natural lighting! Whenever I manage to take pictures of food it's always at night.. or outdoors with sunlight that's too harsh.. or in rooms where the sunlight enters but isn't that bright. I used the window of my bedroom for these shots today. I didn't add a diffuser with a soft sheer curtain either. I just positioned the table in such a way it caught the best lighting. And I experimented a lot with shutter speeds, ISOs, exposures, and apertures..